This blog post is really just to keep me honest! I have WAY too many unfinished projects.
Baby Girl Cardigan:
A few weeks back I decided I was going to try a new project. I grabbed some baby yarn that Paul had picked out and got to work following this pattern - Swing Set Cardigan. You need to have a Lion Brand account to view it. Sign up, it's free!
I finally got all the pieces done and put it together. Aside from one sleeve being a bit wider than the other, I think it turned out pretty good for the 1st time. I still have to sew on a cute button & weave in the tails. (I hate that part the most). I'll be sure to update you with photos!
Face Cloths turned Facial Pads:
I had some cute Red Heart Eco-Cotton Yarn in Candy Marl. I wasn't sure what I wanted to do with it. I began making a face cloth by following a pattern for a granny square with a rounded center. I thought it would be an easy project to do on the road since it's small, compact & easy. As soon as I got home, I changed my mind. I have a bunch of terry face cloths now and I hardly use those. What is the sense in making more. What I could use more of is cotton balls or cotton pads to apply Lavendar Witch Hazel Toner to my face. I recently had to purchase another package of cotton. And being tha I want to limit single use items in our home, why not make some facial pads with my cotton yarn. I think they'd make great scrubbies too for make up removal & exfoliating. I plan on following the following patterns 1 & 2 ... or just making a simple 2-3 inch round. Now I'll just need to find my mesh bag for delicates. I'm sure it's somewhere.
I also plan on sewing some square flannel cloths of about the same size. I think the flannel may end up better for toner application and the scrubbies better for face washing. I won't know until I test them out.
I believe that will limit my cotton use to nail polish remover only. Not too shabby.
Sewing Update:
I haven't picked up my machine in forever, but I seriously need to get onto tailoring a few things or I'll have these stacks of clothes sitting in the sewing basket FOREVER.
Showing posts with label Home Craft. Show all posts
Showing posts with label Home Craft. Show all posts
Thursday, September 20, 2012

Sunday, April 1, 2012
Kitchen Update
So with spring cleaning in full swing, I convinced Paul to make a few changes to our kitchen. We both love the size of our kitchen but find it a bit lacking in functional space. We both also simply hate the color and cabinetry, however, as renters, there isn't much we could do about that.
We took a drive down south to Ikea. It's a place we don't frequent as it's pretty far and it encourages useless spending. I did however have a clear vision of what I wanted and what I wanted to do with it. Paul and I had differences of opinion when it came to aesthetic appeal, but hey - we have different taste. He's modern... I'm traditional.
I hated how my counter peninsula constantly had stuff on it. I wanted a nice empty work space. So we decided to buy this shelving unit from ikea. It's a great unit because you can stand it upright or on it's side. You can put baskets in them or leave them bare. It's really versatile - we figure when we move it can go behind the couch, against a dining room wall or even in the bedroom.
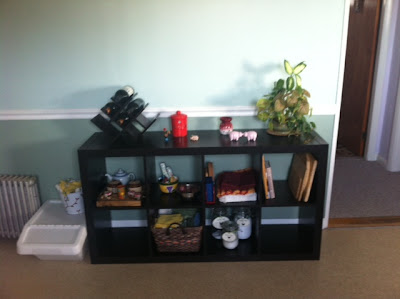
We currently have our recycle bin sitting towards the left. A top is a wine rack, garlic canister, a plant and a few nic nacs. The cubes from left to right contain:
We took a drive down south to Ikea. It's a place we don't frequent as it's pretty far and it encourages useless spending. I did however have a clear vision of what I wanted and what I wanted to do with it. Paul and I had differences of opinion when it came to aesthetic appeal, but hey - we have different taste. He's modern... I'm traditional.
I hated how my counter peninsula constantly had stuff on it. I wanted a nice empty work space. So we decided to buy this shelving unit from ikea. It's a great unit because you can stand it upright or on it's side. You can put baskets in them or leave them bare. It's really versatile - we figure when we move it can go behind the couch, against a dining room wall or even in the bedroom.

We currently have our recycle bin sitting towards the left. A top is a wine rack, garlic canister, a plant and a few nic nacs. The cubes from left to right contain:
- Matte set & tea pot
- a few bowls of goodies/food
- placemats, napkins (cloth and paper), trivets
- cookbooks & cutting boards
- empty
- basket of dish towels
- dishwashing & laundry detergent & baking soda
- empty
Great right? Nice and organized yet still not ugly!
We also purchased a magnetic knife set and though it's not ideal in this spot, it works to clear up the counter.

Which leaves me this.... a nice empty counter and prep space to cook! LOVE IT!

Monday, March 26, 2012
Dishwasher Detergent Woes
Many of you ... (aka the 2 readers that read my blog) may remember that I had posted last year about making my own Laundry & Dishwashing detergents. No? Well I did. I've been thrilled with the Laundry detergent. As a matter of fact - I was almost giddy doing 3 loads this past weekend. Finally having enough sun and air circulation to hang dry was another reason to be a bit excited. The dishwasher detergent however, has been an annoying display of natural soaps gone rogue!
My dishes come out clean... at least they seem clean. I've eaten off of them and haven't gotten sick yet. They just don't look clean. They look cloudy. They look soap scummy! Which is odd considering no actual soap is involved. So... today while perusing pinterest I saw a homemade dishwasher detergent recipe and clicked...
The link lead me to Offbeathome.com and I'm so glad it did. The recipe is the same as the one I've been using but she suggests you add 2-3 drops of dishwashing soap into the machine ... no more or you'll overflow your washer AND a splash of vinegar into the bottom of the washer. This is such a simple thing to do. I've tried the vinegar alone but not consistently. And our rinse agent dispenser seams to be broken so that hasn't been doing the trick.
Now I'll just need to let the Hubs know so that when it's his turn to run the dishwasher he can follow those simple steps. Thank goodness for Costco sized vinegar jugs - we use it for nearly everything... hair conditioning, laundry, dishwasher, cleaning.... COOKING
Thank you, Vinegar!
My dishes come out clean... at least they seem clean. I've eaten off of them and haven't gotten sick yet. They just don't look clean. They look cloudy. They look soap scummy! Which is odd considering no actual soap is involved. So... today while perusing pinterest I saw a homemade dishwasher detergent recipe and clicked...
The link lead me to Offbeathome.com and I'm so glad it did. The recipe is the same as the one I've been using but she suggests you add 2-3 drops of dishwashing soap into the machine ... no more or you'll overflow your washer AND a splash of vinegar into the bottom of the washer. This is such a simple thing to do. I've tried the vinegar alone but not consistently. And our rinse agent dispenser seams to be broken so that hasn't been doing the trick.
Now I'll just need to let the Hubs know so that when it's his turn to run the dishwasher he can follow those simple steps. Thank goodness for Costco sized vinegar jugs - we use it for nearly everything... hair conditioning, laundry, dishwasher, cleaning.... COOKING
Thank you, Vinegar!
Tuesday, March 13, 2012
Spring & Growing
It's that time of year again... that time with the temperatures start rising, the days are getting longer, and my yearning desire to grow foods is in full effect.
This year Paul and I joined our local CSA. I'm so excited for my ~bushel of veggies to be delivered to my office every week. But what about the herbs... yum. I know the CSA includes a few fresh herbs once in a while, but I still plan to grow my own.
Last years basil plant was a true success. If I kept up with trimming and cutting it, it may have lasted longer. Alas, you live and learn. And 5-6 months was not a bad life span in my kitchen.
Our kitchen has a window above the sink with a curtain rod... but no curtain. What? I like the sunlight, the crappy view and the link to the outdoors (err road/strip mall). None the less... it's a perfect window to get sunlight and it's a perfect location to be close to my hands when cooking. So I decided that this spring I'll be planting some herbs inside hanging from this empty curtain rod.
So here are my thoughts....
Here is the window. It's a pretty large window right? Look at that light? (Don't look at the mess of a kitchen or ugly paint color and cabinets).
This year Paul and I joined our local CSA. I'm so excited for my ~bushel of veggies to be delivered to my office every week. But what about the herbs... yum. I know the CSA includes a few fresh herbs once in a while, but I still plan to grow my own.
Last years basil plant was a true success. If I kept up with trimming and cutting it, it may have lasted longer. Alas, you live and learn. And 5-6 months was not a bad life span in my kitchen.
Our kitchen has a window above the sink with a curtain rod... but no curtain. What? I like the sunlight, the crappy view and the link to the outdoors (err road/strip mall). None the less... it's a perfect window to get sunlight and it's a perfect location to be close to my hands when cooking. So I decided that this spring I'll be planting some herbs inside hanging from this empty curtain rod.
So here are my thoughts....
Here is the window. It's a pretty large window right? Look at that light? (Don't look at the mess of a kitchen or ugly paint color and cabinets).
 So I'm thinking from that rod I can hang these from the curtain rod:
All photos from Ikea - click photo for direct link
 This would also look great - I love that they hang lower and are super feminine
I also thought something like this could look cute hanging - and you could fill it with cute colorful tiny pots of your favorite small herbs.


Wednesday, February 8, 2012
New Beanie!
I finally put my hand dyed wool to good use. 3 years ago (yeah I know ridiculous) I went to Union Square just to check out the Catskills Merino Sheep Farm stand. What I was met with was hanks upon hanks of colors and soft cushiony yarn. So of course $115 later I came home with 3 green hanks, 2 gray and 3 undyed. And then I decided that my skills weren't worthy and left them in a bag... until this past weekend. When I decided it was time to whip out that green yarn and make myself the saggiest of all saggy beanies!
I found the pattern on ravelry. Click here if you are interested.
And this is what I ended up with....


Now I just need to decide - add buttons or leave it be.
Tuesday, November 8, 2011
Afghan DONE!

Do you remember this (& this) afghan I've been working on sine May?? I finally sat down and finished it. It took a while since I refuse to crochet when it's hot. It ended up totaling 120 squares with 6 rows of edging. I think it came out great. Paul likes it as well. For now it's sits folded a top our sofa for chilly nights or frosty mornings. I think this will be the last granny or motif creation for a while.
 I decided to crochet the squares together using only the back loops. I used that cinnamon color yarn pictured in the 1st row of the boarder to join the squares.
Let me know what you think!
Thursday, September 15, 2011
Crochet Update
A while back I told you about a blanket I was working on.... that blanket took a little bit of a back seat as summer came along. We don't have an AC installed and for the most part, crocheting is not conducive to staying cool.
I've recently picked it back up and have been making steady (but slow) progress.
These aren't actually that many squares; not even enough for a crib blanket. No matter, I love the colors and it's coming along great. I love how all the colors work well together. I sort of wish I had picked up a 6th color, but I'll make due.
 I really do think they look so pretty together. The right mix of depth and light.
 I may be up to this... forever...

I've recently picked it back up and have been making steady (but slow) progress.
These aren't actually that many squares; not even enough for a crib blanket. No matter, I love the colors and it's coming along great. I love how all the colors work well together. I sort of wish I had picked up a 6th color, but I'll make due.
 I really do think they look so pretty together. The right mix of depth and light.
 I may be up to this... forever...
Friday, September 9, 2011
Sewing Room?
So I designated the den my sewing room, but Paul also dedicated it the Xbox room... and it is also kind of our office. But it works. We fit everything we needed to into the space. Nah, it's not exactly a cohesive decor plan, and no, it's not always 100% functional.... but it's the best we can do with the space that we have.
This is my sewing corner. We put our old dining table there for now. It's not really great for sewing being round and all, but it's fine for now. The shelves above hold a bunch of my little nicknacks and notions.
 You can see up top on the left is my yarn swift. I love that thing. Next is a puzzle of me snowboarding from a good friend. That zebra print bag is filled with an abandoned project I may make into something else. The frame holds a poem about boys from Paul's Mom & a personalized box of dominoes. The second shelf holds various baskets of fabric, tarn, and books. Then the 3rd holds my yarn baller, a few pigs, more baskets of supplies, a yellow flower put I've filled with ribbon & a figurine of Che. The last shelf holds a jar of my hooks & needles, a mushroom needle holder from my sister, a flower pot of scissors and other supplies, and that last basket is where Paul hides all of our electric chargers.
 Here is a little sneak at some of the books I've been using lately to create some fun knit and crochet goods. I highly recommend The Happy Hooker. It has a lot more young and modern options.

And all throughout those shelves are photos of people I love. More photos will definitely be added to this room, but they have yet to be printed. For now there is a photo of Paul and I from our early dating years, my sister and I at her graduation, and a photo of my grandpa... one of his last before he past.

Centering the room is a futon that I draped my sister's baby blanket on. It has a little hole and is definitely a bit faded but can you believe this blanket rested on our cribs, floors, couches, and cars for us to be cozy since 1983? I love it! My family is filled with talented hookers & knitters & I'm just glad that it hasn't been lost on my generation. Goodness knows I wanted nothing to do with needlecrafts as a child. Directly accross from this futon is a small computer stand with a screen and the Xbox/Kinects consoles.

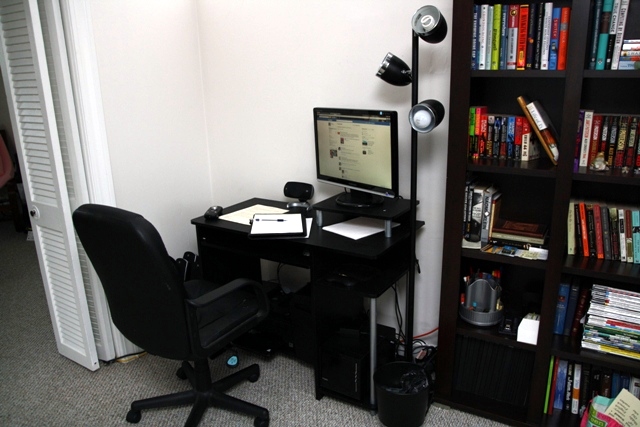
At the very entrance of the room, we have the computer desk, a book case, and a closet. I'm glad we finally have a normal sized desk. What a pleasure to sit at. (The old tiny desk was purchased for our tiny Manhattan apartment years ago. It is now the xbox stand.)

See a desk... with a real chair. You can even peep my notes and resume for my session with the recruiter late this afternoon.

And in the book case, aside from books you'll find little pieces of love... like marble, crystal and jade pigs and frogs... as well as small pieces of inspiration. The other day I was thinking of great quotes, and Dr. Suess has some of the best. I printed out one of my favorites. Anyone who knows me knows I LOVE to read... so I printed it out. Then busted out the crayons and made it a rainbow. I found myself doodling the other week and I kind of linked how it turned out. I took a note from this and cut my doodle out in the shape of a sparrow. I like it sitting perched up there. Maybe one day I'll get sick of it and take it out... but for now... I dig it.

And finally, in the closet, I have purchased a over the door shoe rack. I have filled the pockets with various skeins of yarn. Inside the closet needs some work. I'm thinking of moving around some storage boxes to make those paper supplies a little more accessible. On the shelf up top are some various crafting supplies (like glue guns, hole punches, paper stock, etc...)
 And here you can see some of my prized possessions, yarn! Unfortunately, these are mostly scraps that were either given to me or left over from another project... or found on clearance somewhere... so I don't know many of their colors or even dye lots. I have a few winter accessory ideas for some but others, I have no clue. If you need some scrap yarn (especially acrylics) let me know!


This is my sewing corner. We put our old dining table there for now. It's not really great for sewing being round and all, but it's fine for now. The shelves above hold a bunch of my little nicknacks and notions.

 You can see up top on the left is my yarn swift. I love that thing. Next is a puzzle of me snowboarding from a good friend. That zebra print bag is filled with an abandoned project I may make into something else. The frame holds a poem about boys from Paul's Mom & a personalized box of dominoes. The second shelf holds various baskets of fabric, tarn, and books. Then the 3rd holds my yarn baller, a few pigs, more baskets of supplies, a yellow flower put I've filled with ribbon & a figurine of Che. The last shelf holds a jar of my hooks & needles, a mushroom needle holder from my sister, a flower pot of scissors and other supplies, and that last basket is where Paul hides all of our electric chargers.
 Here is a little sneak at some of the books I've been using lately to create some fun knit and crochet goods. I highly recommend The Happy Hooker. It has a lot more young and modern options.
And all throughout those shelves are photos of people I love. More photos will definitely be added to this room, but they have yet to be printed. For now there is a photo of Paul and I from our early dating years, my sister and I at her graduation, and a photo of my grandpa... one of his last before he past.


Centering the room is a futon that I draped my sister's baby blanket on. It has a little hole and is definitely a bit faded but can you believe this blanket rested on our cribs, floors, couches, and cars for us to be cozy since 1983? I love it! My family is filled with talented hookers & knitters & I'm just glad that it hasn't been lost on my generation. Goodness knows I wanted nothing to do with needlecrafts as a child. Directly accross from this futon is a small computer stand with a screen and the Xbox/Kinects consoles.

At the very entrance of the room, we have the computer desk, a book case, and a closet. I'm glad we finally have a normal sized desk. What a pleasure to sit at. (The old tiny desk was purchased for our tiny Manhattan apartment years ago. It is now the xbox stand.)

See a desk... with a real chair. You can even peep my notes and resume for my session with the recruiter late this afternoon.
And in the book case, aside from books you'll find little pieces of love... like marble, crystal and jade pigs and frogs... as well as small pieces of inspiration. The other day I was thinking of great quotes, and Dr. Suess has some of the best. I printed out one of my favorites. Anyone who knows me knows I LOVE to read... so I printed it out. Then busted out the crayons and made it a rainbow. I found myself doodling the other week and I kind of linked how it turned out. I took a note from this and cut my doodle out in the shape of a sparrow. I like it sitting perched up there. Maybe one day I'll get sick of it and take it out... but for now... I dig it.

And finally, in the closet, I have purchased a over the door shoe rack. I have filled the pockets with various skeins of yarn. Inside the closet needs some work. I'm thinking of moving around some storage boxes to make those paper supplies a little more accessible. On the shelf up top are some various crafting supplies (like glue guns, hole punches, paper stock, etc...)
 And here you can see some of my prized possessions, yarn! Unfortunately, these are mostly scraps that were either given to me or left over from another project... or found on clearance somewhere... so I don't know many of their colors or even dye lots. I have a few winter accessory ideas for some but others, I have no clue. If you need some scrap yarn (especially acrylics) let me know!

Thursday, September 8, 2011
Pumpkin Popovers
I love pumpkin, so I was super pleased when I was catching up on my blog reader yesterday morning over a cup of coffee and came across this recipe for pumpkin popovers at Domestically Speaking.
I realized that aside from flour, I had everything I needed on hand. Then as luck would have it, I was perusing the Christmas Tree Store looking for mason jars when I came across shelves of Bob's Red Mill flours, mixes, etc.... I grabbed a bag of whole wheat flour. I've been wanting to try and bake a few things with whole wheat lately and this gave me a change, without spending tons of cash. The bag was only $4.50 while usually in the $20 range, I consider this a steal. I should have probably bought more. Oh well.
Anyway, I followed Domestically Speaking's recipe almost exactly. I didn't have clove, so I just left it out. I also substituted whole wheat flour for all purpose flour.
I did utilized her tip for just dipping the tops of the popovers in butter and sugar so they wouldn't be so sweet. Turns out they aren't too sweet to begin with, so I'd recomend going either way based on your sweet tooth.
They turned out delish


See even Paul liked them... he will be very mad these pics got posted HAHA
Thursday, August 25, 2011
Yogurt Round 2
So I thought my 1st batch of yogurt was delicious, but I thought it could be a little thicker or at the very least, separate less.
Changes to the original recipe:
I decided to make another batch today since we had just finished our last jar from the 1st try. I wanted to make a few changes to see if it would improve the texture. The 1st change I made is to purchase Yoplait yogurt as a starter rather than Dannon. I also read this Melissa's Food Blog for some advice. What I did try from her method was to warm the milk to 190 degrees and keep it there for 30 minutes. Most recipes call for heating it to 190 and immediately bringing the temp down to 120 degrees. She says she does this to thicken the yogurt. In addition to those changes, I also added another Tsp. of Pure Vanilla Extract as compared to the recipe. I wanted a very obvious vanilla flavor and scent.
Results:
The yogurt was great. It was slightly thicker, more flavorful, and smooth (less grainy). The differences were noticeable right away. The yogurt still isn't thick like a greek yogurt, but still satisfying. Paul noticed the change in flavor right away... it must have been that added tsp of vanilla. We both noticed a better texture. I don't know if this is because of the yoplait or because of the 30 minute heating at 190 degrees. My next batch will use a cup of yogurt from this batch as a starter and I guess we'll see how that goes.
Here are some supplies that I use.
 I begin by bringing a pot of water to a boil to clean my jars. I toss the jars and caps in there and let it come to a boil. Then I use a pair of thongs to fish them out and lay them on a clean dishtowel to dry. I usually skip this process if the jars came strait out of the dishwasher. In this case, they were new and came out of my basket in the backroom of jars.
 I pick up mason jars when they are on sale and save most of my glass jelly jars for reuse. I even keep olive and pickle jars, but those need a bit of sunlight and a good wash to get the smell out.
I also make sure I have my cooler in the kitchen nice and handy (and clean).

Next I bring the milk to temperature in a second pot. I use a candy thermometer to keep track of the temperatures.
 After about 30 minutes at 190 degrees, I place the entire pot into a sink of icey cold water to bring the temperature down to 120 degrees. Be careful not to place a cast iron or ceramic pot of hot liquids into ice water... it will crack.
Once at 120 degrees, I add the vanilla, sugar & yogurt starter. I stir till combined and ladle into my clean mason jars.
I place the jars into the clean cooler. So here is the step where I deviate a bit. I've already heated water to clean my mason jars. Rather than heat another gallon of water, I add a couple of cups of cool water to the already hot pot of water until it reaches a temperature of 120 degrees. Once I'm sure it's cool enough, I add approximately 1 gallon (probably more actually because I don't measure) around the jars into the cooler. Close the cooler and set my oven timer to 3.5 hours. I let them sit there to give the cultures time to make this warm sugary milk into yogurt.
After 3.5 hours, I pull the jars out, dry off the outsides, let them rest for a few minutes, then add them to the middle of my refrigerator. I make it a general rule to keep dairy in the center of my fridge away from the door where the temperatures are more consistent and cooler.
 You can click on any of the photos to enlarge.
Friday, July 1, 2011
Yogurt
We love the stuff. Paul takes it in drink form pretty often and I like it with a spoon. I like plain yogurt blended with fresh herbs and lemon juice to top fish or spicy chicken. I like using yogurt with sour cream to make dips. Yogurt is yummy!
I've been buying less and less of it though. I mean really... $1.00 for one small serving... get out of town!
Then today I came across this blog -> www.thefrugalgirl.com
And get this, this chick makes her own yogurt and it looks SUPER SIMPLE. It's definitely time consuming in the sense that you have to be home for a bit. But it's not exactly like you need to be home slaving over a hot stove. Throw a timer own and sit down and relax... or get other chores done while you wait.
Check out how she makes this here:
 I definitely want to try this during my time of relaxation (i.e. unemployment)
I've been buying less and less of it though. I mean really... $1.00 for one small serving... get out of town!
Then today I came across this blog -> www.thefrugalgirl.com
And get this, this chick makes her own yogurt and it looks SUPER SIMPLE. It's definitely time consuming in the sense that you have to be home for a bit. But it's not exactly like you need to be home slaving over a hot stove. Throw a timer own and sit down and relax... or get other chores done while you wait.
Check out how she makes this here:
I definitely want to try this during my time of relaxation (i.e. unemployment)
Thursday, June 30, 2011
Bathroom Rug

I can be honest. This is one of the ugliest bathrooms ever. But it's clean and it's functional and it's going to be ours. So we make do... as always :).
I wanted to make a tshirt yarn rug for in the bathroom, maybe in a bright color to draw the eye away from the dark brown ... everything in there. And I still might. But I need to color tshirts 1st and Paul is not happy with me heading to thrift stores to my more [crap].
In the mean time, I saw this and thought it was too cute!
I wanted to make a tshirt yarn rug for in the bathroom, maybe in a bright color to draw the eye away from the dark brown ... everything in there. And I still might. But I need to color tshirts 1st and Paul is not happy with me heading to thrift stores to my more [crap].
In the mean time, I saw this and thought it was too cute!

It's definitely immature... but so are we. It's so funny and cute and silly. And it's an owl so of course I'm already in love.
There is a whole Awesome Owl collection at target, but that might just be taking this a little too far.
Paul, what do you think? (That I'm crazy?)
There is a whole Awesome Owl collection at target, but that might just be taking this a little too far.
Paul, what do you think? (That I'm crazy?)

 These don't even match do they?

But I must say, I also quite like this. It reminds me of our wedding... a lone tree, leafless surrounded by white. The white would also bring some brightness to the bath... and get dirty often. Though we won't be having shoes in the house. Gotta keep that carpet clean!
Ugly Brown Room
I mentioned in my previous post, the infamous ugly brown room. It's ugly, it's dark, it's paneled, and it's temporarily ours. Because of the temporary part, we can't paint it, but oh how I'd love to paint it a nice light cream. I mean check this place out (click to enlarge), it's terrible. The panels are so dark, the molding doesn't match, and the room doesn't get THAT much light.
So I thought, and thought, and googled and came up with what I think will be a great solution.

#1 - I'd like it to be the guest room, as I said, it's will be the least favorite and therefore, least used room in the house. Sorry Parents, Siblings, Grandmas & Friends, you'll get the ugly brown room when you come visit. But I promise I'll do my best.
#2 - We can't change it so we'll embrace it, but we'll also cover it. At least we'll cover some of it. Instead of a headboard, or pretty bed frame, I decided I wanted to cover 1 entire wall with curtains.
Ikea is good enough to sell some wire curtain rods and for cheap. I'm hoping to hang them across one wall pulled taut. From these I'd like to hang a curtain or fabric panels in a color that would brighten but still compliment the brown panels.


#3 - Accent it with a nice bedding set that ties it all in
#4 - Keep it empty and clutter free
#5 - Add LOTS and I mean lots of levels of lighting to this dark room.
So I think this will work to improve the room. It will be a far cry from what I'd do if I had the ability and the ok to paint, but I think it will work. I quickly searched the web world for some textile ideas that will tie in together and I've come up with a few options. Let's see what the hubby thinks of my ideas though.

Here is a photo from Manolo home. Granted this room gets TONS of light and has light walls and a fabulous rug, but you can see the effect hanging curtains as a well covering can make.
To save some money, I'm considering drop cloth curtains rather than store bought curtains. I'm sure we'll need a few panels and I'd like for them to go from floor to ceiling. Google drop cloth curtains and you'll see they look like WONDERFUL canvas curtains in a nice neutral color.

Here is a good example. This one is embellished but it doesn't have to be.
I thought that this along 1 wall would bring a lighter color into the room while still complimenting the dark brown paneling. The queen sized bed can adorn a nice complimentary accent color that can be showcased throughout the room in small doses.
 I think this quilt set from Walmart is adorable. I love that it is reversible. I think the obvious femininity of this quilt set will help offset the masculinity of the dark paneling. I can picture light sage and rose accents throughout the room via a small rug, candels & maybe even a throw pillow on a chair. Along with some cream accent furniture, I think this can really help the room.
However, we are trying to save money and thus, buying new bedding for a guest room may be out of the question for now. Our current quilt set is wonderful with it's pale green & white patterns, but won't do well in the light blue room. So maybe it's best to use that at least for now with a few accent pillows that I can stitch up myself. Oooo and a matching painter's drop cloth bed skirt! Hey I can do it right?

Maybe I can do pillows in one of these patterns or even frame the piece of fabric in a 12 x 12 to hang on the wall. I'd actually prefer maybe a solid bedding with colored accents, but like I said, money... tight... saving... using what we have.


click on any of the photos for their location.
Also please - send me your ideas! This room needs your help!
So I thought, and thought, and googled and came up with what I think will be a great solution.

#1 - I'd like it to be the guest room, as I said, it's will be the least favorite and therefore, least used room in the house. Sorry Parents, Siblings, Grandmas & Friends, you'll get the ugly brown room when you come visit. But I promise I'll do my best.
#2 - We can't change it so we'll embrace it, but we'll also cover it. At least we'll cover some of it. Instead of a headboard, or pretty bed frame, I decided I wanted to cover 1 entire wall with curtains.
Ikea is good enough to sell some wire curtain rods and for cheap. I'm hoping to hang them across one wall pulled taut. From these I'd like to hang a curtain or fabric panels in a color that would brighten but still compliment the brown panels.
#3 - Accent it with a nice bedding set that ties it all in
#4 - Keep it empty and clutter free
#5 - Add LOTS and I mean lots of levels of lighting to this dark room.
So I think this will work to improve the room. It will be a far cry from what I'd do if I had the ability and the ok to paint, but I think it will work. I quickly searched the web world for some textile ideas that will tie in together and I've come up with a few options. Let's see what the hubby thinks of my ideas though.
Here is a photo from Manolo home. Granted this room gets TONS of light and has light walls and a fabulous rug, but you can see the effect hanging curtains as a well covering can make.
To save some money, I'm considering drop cloth curtains rather than store bought curtains. I'm sure we'll need a few panels and I'd like for them to go from floor to ceiling. Google drop cloth curtains and you'll see they look like WONDERFUL canvas curtains in a nice neutral color.
Here is a good example. This one is embellished but it doesn't have to be.
I thought that this along 1 wall would bring a lighter color into the room while still complimenting the dark brown paneling. The queen sized bed can adorn a nice complimentary accent color that can be showcased throughout the room in small doses.
I think this quilt set from Walmart is adorable. I love that it is reversible. I think the obvious femininity of this quilt set will help offset the masculinity of the dark paneling. I can picture light sage and rose accents throughout the room via a small rug, candels & maybe even a throw pillow on a chair. Along with some cream accent furniture, I think this can really help the room.However, we are trying to save money and thus, buying new bedding for a guest room may be out of the question for now. Our current quilt set is wonderful with it's pale green & white patterns, but won't do well in the light blue room. So maybe it's best to use that at least for now with a few accent pillows that I can stitch up myself. Oooo and a matching painter's drop cloth bed skirt! Hey I can do it right?
Maybe I can do pillows in one of these patterns or even frame the piece of fabric in a 12 x 12 to hang on the wall. I'd actually prefer maybe a solid bedding with colored accents, but like I said, money... tight... saving... using what we have.
click on any of the photos for their location.
Also please - send me your ideas! This room needs your help!
Subscribe to:
Posts (Atom)